Sunday, May 24, 2015

Vegan Summer Rolls


When we do our Brass Lotus workshops, one of the favorite dishes we prepare as a group is Summer Rolls, also called Fresh Rolls. It is fun to work as a group and it also is a great way to learn that working with rice paper is not as daunting as you would expect. Rolling Summer Rolls is also a cool way to make your own appetizer during parties.

Ingredients 
 
6 large Portobello mushrooms, grilled and sliced thin (optional)
Tofu, marinated, grilled or baked and sliced into  thin strips
Romaine Lettuce
Any combination of the following:
Chopped Nappa Cabbage
Spring Mix
Pea Shoots
Cilantro
Mint
Thai Basil
Rice Paper
Prepare your veggies. Grill or roast the mushrooms and/or tofu and slice very thinly. Make sure all of the lettuce, greens and herbs are trimmed, cleaned, well drained, chopped if necessary and ready to use.


Making the rolls:  

Begin by dipping one sheet of Rice Paper in warm water. Rice Paper only needs a quick dip in warm water to soften. Do not “soak” the rice paper for too long because it will get too soft and be impossible to work with. Start with a large bowl of warm water, about bath water temperature. Rotate the rice paper in the bowl of water or quickly immerse it in the bowl for about 2 seconds. It may still feel a bit stiff but will soften as you work.

Lay the rice paper on a cutting board and s tart assembling your ingredients. On the end closest to you and about ½’ in lay a piece of romaine. Now lay the other filling ingredients on top of the lettuce – DO NOT OVER STUFF! Slowly roll the rice paper and filling away from you and tuck the filling toward you and roll as you go. After one complete rotation, fold the ends in and continue rolling the rest of the way.
Serve with Soy Ginger Dipping Sauce or Sweet Chili Sauce
Best when served fresh. To store wrap individually in Saran Wrap.


SOY GINGER DIPPING SAUCE


Ingredients:
2 T organic sugar
¼ cup soy sauce, tamari or Bragg Liquid Aminos™
¾ cup water
2 tsp cornstarch mixed with 2 tsp water
1 T fresh lime juice
2 tsp fresh grated ginger root
1 clove garlic, minced (1 tsp)
2 T chopped green onions (optional)


Combine the sugar, soy sauce, and water in a small saucepan. Bring to a boil. Stir in the cornstarch/water paste. Reduce heat to a simmer and add the garlic, ginger, lime juice and green onions. Continue to simmer, stirring frequently, for about 2 minutes to blend the flavors. Chill until ready to serve.


Sunday, March 15, 2015

Vegan Corned Tempeh Rueben Sandwiches with GF and No Oil options


   It's nearly St. Patrick's Day! Following tradition, I used to make corned beef, cabbage and potatoes for dinner every March 17th. Ever since embracing a more compassionate life we've opt for roasted carrots and cabbage with a side of mashed potatoes. That actually is delicious, I'm getting kind of hungry just thinking about it! I wanted to try to replicate corned beef though. I contemplated - and still may try "corned jackfruit". Inspiration arrived when my daughter and I had a tempeh Rueben sandwich at Zingerman's Deli in Ann Arbor last week. It was fantastic! It was also (with a small bag of chips) $15. So, naturally, being thrifty and enjoying a challenge I thought I could replicate and perhaps even improve upon that sandwich.

   The resulting sandwich was a hit! I would start the corned tempeh the day before serving to give it a chance to really soak up the "corned" flavor. All in all, this sandwich is a satisfying meal that needs little else to accompany it, except maybe a nice half-sour pickle.

Corned Tempeh Ruebens  Serves 4 generously

In addition to the Corned Tempeh ingredients you will need:

1 loaf of sliced rye or sourdough bread -or- Schar Gluten-Free Deli slices
Thousand Island Dressing (recipe below) or grainy mustard for an oil-free option
Sauerkraut
Daiya Swiss slices (optional - I didn't use them)
A little Earth Balance or Olive Oil or a good non-stick pan for grilling the sandwiches


Making the Corned Tempeh

2 Packages of tempeh - I used Trader Joe's brand - cut in half (so now you have 4 squares of tempeh)
1 C Red wine
4 T Pickling spices
2 T mild yellow (or any flavor)  miso- I also got this at Trader Joe's
2 C Water
1 Beet - washed and sliced


In a low, wide covered pan pour the wine, add the spices, sliced beet and miso.


Arrange the tempeh squares around the pan.


Add the water. Cover and simmer on low for 30- 45 minutes. Adding more water, if necessary.  Turn occasionally to thoroughly and evenly flavor the tempeh. Also the beet slices add a nice color. You want to end up with about a cup of liquid. Remove pan from heat and transfer the tempeh and broth to a sealed container and place in the refrigerator for 24 hours. Turn the pieces if you happen to think of it. After 24 hours the liquid will be absorbed into the tempeh.

Making the sandwiches

You can prepare your tempeh one of two ways:
1) Brown the whole square in pan on the stovetop in a non-stick pan or with just a touch of olive oil.
-OR-
2) Make a paste of brown sugar and mustard. coat the tempeh pieces and brown in a 375 degree oven just until bubbly. This is also acceptable to serve sliced with cabbage and potatoes for a traditional style St. Pat's feast.

Next slice the tempeh slightly thin. I use a serrated knife for this and work slowly and carefully trying not to crumble the tempeh.


Assembling the sandwiches:
Spread a generous amount of Thousand Island Dressing on each slice of bread - for an oil free option use grainy mustard.
Top one slice with some sliced Corned Tempeh and a generous amount of sauerkraut. Put your other slice of bread on top and we are ready to grill this thing!
I used a cast iron skillet over medium low heat. I used a bit of Earth Balance on the outside of the sandwich, too.
Once your pan is heated place the sandwich in the pan - then I like to really squish then down while grilling so, I put another cast iron pan on top. Grill for 3-5 minutes. Flip gingerly - like, oh so gingerly so it doesn't fall apart and grill the other side for another 2-3 minutes.

(optional amazement) for a completely non-traditional treat you can add baby spinach, sliced avocado, grilled onion - the sky's the limit! Or you can just do what I do and add some more Thousand Island Dressing.

Cut that sandwich in half, make it look all pretty on a plate and BOOM! dinner is served.


Sláinte, iterally translates as "health" in Gaelic. For your health. For the health of the planet. I hope you enjoy this delicious, compassionate option this St. Patrick's Day or anytime you get a hankering for a big ol' deli sandwich.

Sláinte, my friends!


Thousand Island Dressing:

1/2 C Ketchup
1/2 C Just Mayo
4 T Sweet pickle relish
1 T Horseradish (optional)
1 T Grated onion (optional) 

Just mix it up and it's ready to go. Use as a sandwich topping or salad dressing.


Sunday, February 22, 2015

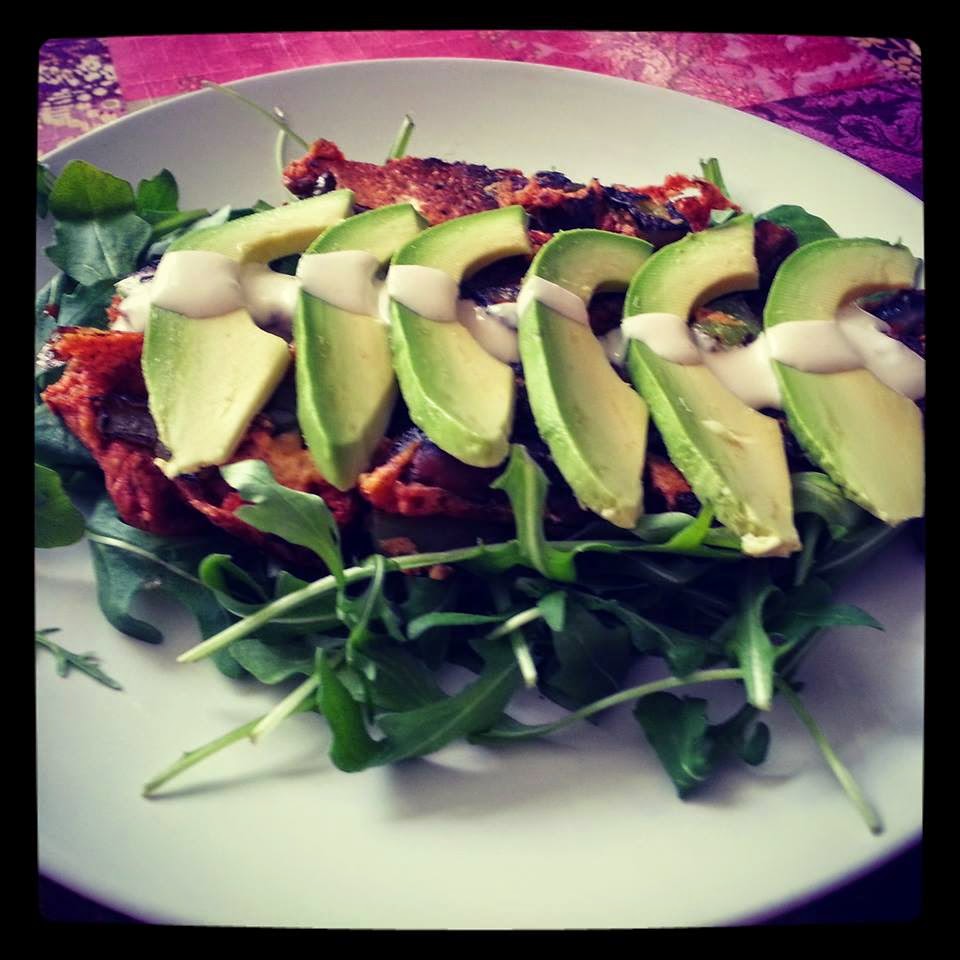
Chickpea Omelet


Mix dry ingredients in a small bowl:
½ C Chickpea flour
¼ t Salt
¼ t Turmeric
¼ t Baking soda
½ t Trader Joe's 21 Salute seasoning

Add:
½ unsweetened plant based milk ( I used TJ’s coconut beverage)
Mix well.
Heat a cast iron pan over medium heat. When pan is heated oil lightly and pour batter into pan.
Top with:
A selection of sautéed veggies - mushrooms, peppers, onions, zucchini, asparagus - anything!

When omelet puffs up – flip over and finish cooking until dry in center. (like a puffy pancake)
Remove from pan and place on top of:
1 C baby arugula

Top with:
¼ Avocado – sliced
Red Hot Tahini

Red Hot Tahini – your favorite hot sauce mixed with tahini, water and salt

Tuesday, February 17, 2015

Decadent Dark Chocolate Truffles


300 grams of dairy free dark chocolate (chocolate bars)
240 ml coconut milk
3 Tablespoons of coconut oil
¼ teaspoon sea salt

using a large kitchen knife, chop the chocolate into small pieces – the smaller the better. Place the chopped chocolate into a medium mixing bowl.  Add the coconut oil and salt to the chocolate. Heat the coconut milk just to a boil and slowly pour over the chocolate mixture while stirring. Stir until smooth. Place plastic wrap on the surface of the chocolate and refrigerate overnight.
When completely chilled you will have a lovely bowl of chocolate ganache. Before rolling these into truffle size pieces I have a plate chilling in the refrigerator or briefly in the freezer.  Working in small scoops – and working quickly, roll small spoonfuls of ganache into balls using your hands. This gets messy, there is no way around it.  Place the balls on the chilled plate. When you have finished rolling the balls return the plate to the refrigerator while you prepare the next step.
Depending on how you want to finish the truffles have a bowl or bowls ready with any of the following: 
Pink Himalayan Salt
Cocoa powder
Finely chopped nuts
Shredded dried coconut
Matcha powder
Curry powder (heavenly!)
Smoked Paprika
Remove the truffles from the refrigerator a gently roll in any of the finishing ingredients you have selected. Store the finished truffles in a sealed container in the refrigerator.

* Based on Jamie Oliver’s recipe

Fat Tuesday Red Beans and Rice

Loosely based on traditional Louisiana Cajun style red beans and rice, this scrumptious, hearty dish is a perfect plant-based Mardi Gras treat that is still compassionate, clean eating. It has a little zip to it, too. Boom, Boom, Boom.

1 pound small red beans - soaked overnight in 6 cups water then drained
1 green bell pepper - diced
2 ribs celery - diced
1 shallot - diced
3 cloves garlic - minced
1 tablespoon olive oil or 2 tablespoons water for sauteing veggies
2 teaspoons dried oregano
2 teaspoons smoked paprika
1/4 teaspoon cayenne pepper (or more to taste)
1/4 teaspoon ground black pepper
2 bay leaves
2 cubes Edward and Sons Veggie bouillon

 Drain and rinse the soaked beans. Diced the shallot, celery and bell pepper. Mince or press the garlic.


Saute the diced and minced veggies in a large stock pot over medium low heat until they begin to turn clear.  You may use 1 Tablespoon olive oil for this or 2 Tablespoons water for ultra low fat version.


 Add your spices and herbs, stir briefly. I always like to warm my seasonings a tiny bit, it seems to deepen the flavor. Hold up on adding the bay leaves for just a minute.


Add the soaked, drained, rinsed beans to the pot.
Are they soaked? Are they drained? Are they rinsed?
These beans have an identity crisis! Shut up, beans and get in the pot.


Add 7 cups of water and the bay leaves.

Cover and simmer over low heat for 1 to 1 1/2 hours. Low and slow. If you forgot to soak your beans this part may take up to 3-4  hours.


Check the beans for tenderness. Once the beans are nice and tender add 2 cubes of Veggie bullion ( I added the photo of the Not-Chick'N because most folks are familiar with that one). Never add any type of salt to beans until they have reached the proper tenderness. Salt inhibits the beans from becoming tender.


Start a pot of rice. I like short grain brown rice, but prepare your favorite while the beans continue to simmer. at this point you may taste the pot liquor (potlikker or broth) for seasoning. Add a bit more cayenne if you like it hotter. I like to add Frank's Red Hot or Tapitio at the table.


To serve, put a nice ladle full of beans in a bowl. Top with a scoop of rice and some chopped green onions.
Add a dash or two of hot sauce and you'll be in bean eatin' heaven! Laissez les bons temps rouler!


rel="image_src"


Sunday, October 19, 2014

Harvest Pumpkin Date Bars - Gluten Free and Vegan


Harvest Pumpkin Date Bars - Gluten Free and Vegan

Oat Crumble Crust

3/4 C Coconut Oil
1 C Coconut Sugar
1/4 t Molasses
1 C Bob's Red Mill GF Flour
1/2 C Almond Flour
1/4 t Xanthan Gum
1 t Vanilla Extract
1 C GF Rolled Oats
1/2 t Baking Soda
1/2 t Sea Salt

Pumpkin Date Filling

1 13 oz Package of Date Paste *
1/4 C Unsweetened Apple Sauce
1/3 C Canned Pumpkin Puree
3 T Unsweetened Apple or Cherry Juice

Preheat oven to 375 F. Line a 13 x 9 baking pan with parchment paper.
Start by making the filling so that it may cool and be easier to handle when building your bars.
Place the date paste and apple sauce in a small saucepan on low heat and combine using a fork.
Next add the pumpkin puree and combine, again I have found a fork works best for this.
Now, add the juice and really stir it up until mixture is warmed through an about the consistency of thick frosting. remove from heat and let cool.

Next make the crust. Start by combining the oil, sugar, molasses and vanilla using a hand mixer on low speed in a medium mixing bowl. It takes a few minutes for the coconut oil to warm up. Be patient and mix until slightly fluffy in texture. In a small bowl combine GF flour, almond flour, xanthan gum, baking soda and salt. stir mixture well and then add to the oil/sugar mixture and mix on low speed for a minute or two until well incorporated. Next, using a large spoon, stir in the oats.

Okay, it's time to assemble the bars. Press half the oat mixture in to the parchment lined baking pan. I used the bottom of a metal measuring cup - it's tricky and sticky! Now place tablespoons of the filling on top of the oat mixture in the pan. Use a butter knife and carefully spread evenly over the bottom crust mixture. Sprinkle the remaining oat mixture on top and again carefully press down - I used the bottom of the metal measuring cup again.

Bake at 375 F for 30 minutes. Cool 10 minutes and then carefully lift the whole solid slab out by holding the edges of the parchment paper. Lay this whole thing - parchment and all on a cutting board. Cut into squares and let cool 10-20 more minutes before serving. These store well if you put parchment under and between layers of bars. I did not cover them for storage - but things don't last long around here.


Wednesday, January 1, 2014

Aged Vegan Cashew Cheese

Cheese. Delicious. Creamy. Cheese-y. Cruelty-free. Dairy-free. Dreamy cheese.


Honestly, this stuff is delicious. 
I recently served some at some holiday gatherings and folks thought it was dairy cheese.
Some folks thought it was goat cheese and some thought it was brie. 
Everyone thought it was yummy.
Ingredients:
1 1/2 C raw cashews
1 1/4 C cold water
2 heaping tablespoons non-dairy yogurt with active cultures
1/8 - 1/4 cup sauerkraut juice (from active probiotic sauerkraut - not the stuff in the can)
1/3 C coconut oil
1/8 C nutritional yeast
1 teaspoon salt (or more to taste)
teeny tiny pinch of garlic powder
2 teaspoons agar powder (not flakes)


Start by soaking 1 1/2 cups of raw cashews overnight in 1 1/2 cups of cold water and 1/2 tsp. salt.


In the morning the cashews will be swollen to about twice their original size.
Discard the soaking water.
Put the drained cashews, 2 T soy yogurt*
*you can use this:  http://veganasiwannabe.blogspot.com/2013/12/delicious-creamy-soy-milk-yogurt.html


1/3 Cup coconut oil (use refined if you don't want your cheese to taste like coconut)


1/8 Cup Nooch (nutritional yeast -loaded with B vitamins including B12!)


Blend it all up until very smooth - 5 minutes or so.


Here's something cool! This is a Chinese pickling jar.
The top fits into a ring on the top of the jar that is a reservoir. 
This lid keeps bad bacteria out while allowing the contents to breathe a bit.
As gases form during fermentation, the lids burps occasionally.


Pour your blended cashew mixture into a jar.
If you don't have one of these fancy schmancy jars, just use a regular big jar and cover the top
with a cotton cloth - like a clean handkerchief or cloth napkin or clean old cotton t-shirt
and hold it in place with a rubber band around the rim.
This will keep bad stuff out but let fermentation occur without exploding the jar.


Here's a close up of that reservoir I mentioned above.
I'm like a regular show-off.


Ok so - here's the story, if you want something mild and buttery, let this ferment for 24-36 hours 
depending on how warm your house is etc. 
Taste test your mixture after 24 hours. If you like it you're done with fermentation.
If, on the other hand you want something sharper, more along the lines of sharp cheddar or blue,
then allow your mixture to keep fermenting. 
I just made a batch of sharp - something akin to a sharp white cheddar,
I let ferment for 48 hours.


When fermentation is done, find a couple of ramekins or small dishes you can use to mold your cheese.


Line  them with cheesecloth


You can add some nice looking herbs or edible flower petals or fruit , if you like.
This photo below shows some crushed pink peppercorns.


As your cashew mixture ferments, little bubbles will form on the top.
You may also see some liquid accumulate at the bottom.

Dump the whole mess into a saucepan and heat on medium low.


Lightly sprinkle the agar powder over top - whisking vigorously after each 1/2 teaspoon.


Whisk. Whisk, Whisk.


Pretty soon the mixture will thicken.
Keep whisking another minute.
Then turn remove from the heat.


Pour into your prepared, cheesecloth lined containers


Smooth the surface gently - don't press too hard!


Lightly cover by folding over the cheesecloth and place in the refrigerator for a couple of hours.


Remove your cheese from the mold and unwrap the cheesecloth.
Wet your hands just slightly and sprinkle them with salt.
Rub the salt on the surface of the cheese and put the unwrapped cheese back in the refrigerator
for at least a few hours and up to 2 days.
By letting the cheese rest it dries on the outside creating sort of a rind.
Now - you can serve the cheese fresh and/or you can let it age.
I do both.
I make a small round for eating fresh and I let the larger round age unwrapped for 2 days
then I wrap it in parchment and let it age for as long as I can stand it.
Usually I can make it a week without eating a bit, but it can keep aging after you have some.
I have made it 3 weeks.*
After that it is uncharted territory and you are on your own.


I'm telling you, it's beautiful stuff.
This is a wheel that was aged about 2 weeks.
Make cheese. You can do it!
*aging update: I cut small cubes out of this batch and aged them for different amounts of time.
After about 2 months I had something like an asiago in texture. 
After 1 year I had some thing very dense and hard, almost like a Parmesano Reggiano
Am I suggesting you do this? Heck, no. 
I'm just saying I did.
That's what we call CYA ;)